

基于Ajax的聊天机器人功能的实现
哈喽!大家好呀。如果无聊就和机器人聊聊天吧
在初步进入ajax学习 就忍不住给大家分享今天的劳动成果啦
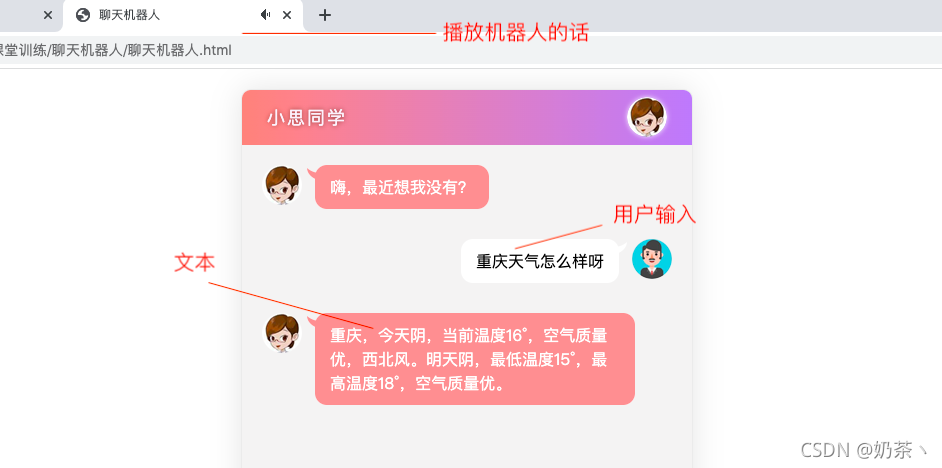
先来看看效果图:

功能实现:
- 点击发送按钮事件
- 将用户输入的内容渲染到页面中
- 点击回车键将表单的内容渲染到页面中
- 获取机器人的内容 渲染到页面中
- 播放机器人的内容
先来看看项目的总体结构
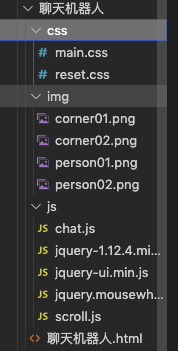
引入相关的文件:


html框架比较简单
小思同学
- 嗨,最近想我没有?
这里的音频播放标签,一定要添加autoplay属性,自动播放,不过不添加这个属性,播放机器人的功能就不能实现哟
main.css
body {
    font-family: 'microsoft yahei';
}
.wrap {
    position: fixed;
    width: 450px;
    left: 50%;
    margin-left: -225px;
    top: 20px;
    bottom: 20px;
    border: 1px solid #ebebeb;
    background-color: #fff;
    border-radius: 10px;
    box-shadow: 0 0 30px rgba(0, 0, 0, 0.1);
    overflow: hidden;
}
.header {
    height: 55px;
    background: linear-gradient(90deg, rgba(246, 60, 47, 0.6), rgba(128, 58, 242, 0.6));
    overflow: hidden;
}
.header h3 {
    color: #faf3fc;
    line-height: 55px;
    font-weight: normal;
    float: left;
    letter-spacing: 2px;
    margin-left: 25px;
    font-size: 18px;
    text-shadow: 0px 0px 5px #944846;
}
.header img {
    float: right;
    margin: 7px 25px 0 0;
    border-radius: 20px;
    box-shadow: 0 0 5px #f7f2fe;
}
.main {
    position: absolute;
    left: 0;
    right: 0;
    top: 55px;
    bottom: 55px;
    background-color: #f4f3f3;
    box-sizing: border-box;
    padding: 10px 0;
    overflow:hidden;
}
.talk_list{
    position: absolute;
    width:100%;
    left:0px;
    top:0px;
}
.talk_list li {
    overflow: hidden;
    margin: 20px 0px 30px;
}
.talk_list .left_word img {
    float: left;
    margin-left: 20px;
}
.talk_list .left_word span {
    float: left;
    background-color: #fe9697;
    padding: 10px 15px;
    max-width: 290px;
    border-radius: 12px;
    font-size: 16px;
    color: #fff;
    margin-left: 13px;
    position: relative;
    line-height: 24px;
}
.talk_list .left_word span:before {
    content: '';
    position: absolute;
    left: -8px;
    top: 3px;
    width: 13px;
    height: 12px;
    background: url('../img/corner01.png') no-repeat;
}
.talk_list .right_word img {
    float: right;
    margin-right: 20px;
}
.talk_list .right_word span {
    float: right;
    background-color: #fff;
    padding: 10px 15px;
    max-width: 290px;
    border-radius: 12px;
    font-size: 16px;
    color: #000;
    margin-right: 13px;
    position: relative;
    line-height: 24px;
}
.talk_list .right_word span:before {
    content: '';
    position: absolute;
    right: -8px;
    top: 3px;
    width: 13px;
    height: 12px;
    background: url('../img/corner02.png') no-repeat;
}
.drag_bar{
    position:absolute;
    right:0px;
    top:0px;
    background-color: #fff;
    height:100%;
    width:6px;
    box-sizing:border-box;
    border-bottom:1px solid #f4f3f3;
}
.drager{
    position:absolute;
    left:0px;
    top:0px;
    background-color: #cdcdcd;
    height:100px;
    width:6px;
    border-radius:3px;
    cursor: pointer;
}

.footer{
    width:100%;
    height: 55px;
    left:0px;
    bottom:0px;
    background-color:#fff;
    position: absolute;
}

.footer img{
    float: left;
    margin:8px 0 0 20px;
}

.input_txt{
    float: left;
    width:270px;
    height:37px;
    border:0px;
    background-color: #f4f3f3;
    margin:9px 0 0 20px;
    border-radius:8px;
    padding:0px;
    outline:none;
    text-indent:15px;
}
.input_sub{
    float: left;
    width:70px;
    height:37px;
    border:0px;
    background-color: #fe9697;
    margin:9px 0 0 15px;
    border-radius:8px;
    padding:0px;
    outline:none;
    color:#fff;
    cursor: pointer;
}
reset.css部分
body,ul,h1,h2,h3,h4,h5,h6{
    margin: 0;
    padding: 0;
}
h1,h2,h3,h4,h5,h6{
    font-size:100%;
    font-weight:normal;
}
a{
    text-decoration:none;
}
ul{
    list-style:none;
}
img{
    border:0px;
}

/* 清除浮动,解决margin-top塌陷 */
.clearfix:before,.clearfix:after{
    content:'';
    display:table;
}
.clearfix:after{
    clear:both;
}
.clearfix{
    zoom:1;
}

.fl{
    float:left;
}
.fr{
    float:right;
}
接下来就是本项目的精华所在
首先为发送按钮绑定点击事件,trim()方法是去除表单里面的空字符,开始为表单内容是否为空来一次判断。
如果用户输入了内容,将表单里面的内容渲染到页面,我相信大家都非常的熟练了
// 为发送按钮绑定鼠标点击事件
  $('#btnsend').on('click', function() {
    var text = $('#ipt').val().trim()
    if (text.length <= 0) {
      return $('#ipt').val('') //用户输入的内容为空
    }
    // 如果用户输入了聊天内容,则将聊天内容追加到页面上显示
    $('#talk_list').append('
' + text + '
接下来就是机器人的回复内容啦:
用一个getmsg函数封装 传递放入参数就是用户输入的内容
下一些ajax的get获取内容,根据文档提供的地址http://www.liulongbin.top:3006/api/robot
当 res.message === 'success' 表示获取聊天信息成功 就接受聊天信息,将信息追加到页面
  // 获取聊天机器人发送回来的消息
  function getmsg(text) {
    $.ajax({
      method: 'get',
      url: ' http://www.liulongbin.top:3006/api/robot',
      data: {
        spoken: text
      },
      success: function(res) {
        // console.log(res)
        if (res.message === 'success') {
          // 接收聊天消息
          var msg = res.data.info.text
$('#talk_list').append('然后就是将文本转化为语音播放功能
同样的封装一个函数getvoice() 传递的参数是接受到的机器人的聊天消息msg
// 把文字转化为语音进行播放
  function getvoice(text) {
    $.ajax({
      method: 'get',
      url: ' http://www.liulongbin.top:3006/api/synthesize',
      data: {
        text: text
      },
      success: function(res) {
        // console.log(res)
        //下面的值可以通过console.log(res)输出查看里面的属性值
        if (res.status === 200) {
          // 播放语音 路径
          $('#voice').attr('src', res.voiceurl)
        }
      }
    })
  }
最后一个功能就是用户按回车也可以发送消息
 // 为文本框绑定 keyup 事件
  $('#ipt').on('keyup', function(e) {
    // console.log(e.keycode)
    if (e.keycode === 13) {
      // console.log('用户弹起了回车键')
      $('#btnsend').click()
    }
}) 学习AJAX